
Configuració accés remot (SSH i RDP) a totes les MV
Rocky
El primer que farem serà instal·lar el SSH amb la següent comanda
[root@localhost super]dnf install -y openssh-serverRocky Linux 9 - BaseOS 4.3 MB/s | 2.5 MB 00:00
Rocky Linux 9 - AppStream 11 MB/s | 9.5 MB 00:00
Rocky Linux 9 - Extras 43 kB/s | 17 kB 00:00
Package openssh-server-8.7p1-38.el9.x86_64 is already installed.
Dependencies resolved.
================================================================================
Package Arch Version Repository Size
================================================================================
Upgrading:
openssh x86_64 8.7p1-45.el9.rocky.0.1 baseos 453 k
openssh-clients x86_64 8.7p1-45.el9.rocky.0.1 baseos 708 k
openssh-server x86_64 8.7p1-45.el9.rocky.0.1 baseos 455 k
Transaction Summary
================================================================================
Upgrade 3 Packages
Total download size: 1.6 M
Downloading Packages:
(1/3): openssh-8.7p1-45.el9.rocky.0.1.x86_64.rp 2.6 MB/s | 453 kB 00:00
(2/3): openssh-server-8.7p1-45.el9.rocky.0.1.x8 2.5 MB/s | 455 kB 00:00
(3/3): openssh-clients-8.7p1-45.el9.rocky.0.1.x 3.3 MB/s | 708 kB 00:00
--------------------------------------------------------------------------------
Total 3.8 MB/s | 1.6 MB 00:00
Rocky Linux 9 - BaseOS 1.7 MB/s | 1.7 kB 00:00
Importing GPG key 0x350D275D:
Userid : "Rocky Enterprise Software Foundation - Release key 2022 <releng@rockylinux.org>"
Fingerprint: 21CB 256A E16F C54C 6E65 2949 702D 426D 350D 275D
From : /etc/pki/rpm-gpg/RPM-GPG-KEY-Rocky-9
Key imported successfully
Running transaction check
Transaction check succeeded.
Running transaction test
Transaction test succeeded.
Running transaction
Preparing : 1/1
Running scriptlet: openssh-8.7p1-45.el9.rocky.0.1.x86_64 1/6
Upgrading : openssh-8.7p1-45.el9.rocky.0.1.x86_64 1/6
Running scriptlet: openssh-server-8.7p1-45.el9.rocky.0.1.x86_64 2/6
Upgrading : openssh-server-8.7p1-45.el9.rocky.0.1.x86_64 2/6
Running scriptlet: openssh-server-8.7p1-45.el9.rocky.0.1.x86_64 2/6
Upgrading : openssh-clients-8.7p1-45.el9.rocky.0.1.x86_64 3/6
Running scriptlet: openssh-clients-8.7p1-45.el9.rocky.0.1.x86_64 3/6
Running scriptlet: openssh-clients-8.7p1-38.el9.x86_64 4/6
Cleanup : openssh-clients-8.7p1-38.el9.x86_64 4/6
Running scriptlet: openssh-server-8.7p1-38.el9.x86_64 5/6
Cleanup : openssh-server-8.7p1-38.el9.x86_64 5/6
Running scriptlet: openssh-server-8.7p1-38.el9.x86_64 5/6
Cleanup : openssh-8.7p1-38.el9.x86_64 6/6
Running scriptlet: openssh-8.7p1-38.el9.x86_64 6/6
Verifying : openssh-8.7p1-45.el9.rocky.0.1.x86_64 1/6
Verifying : openssh-8.7p1-38.el9.x86_64 2/6
Verifying : openssh-server-8.7p1-45.el9.rocky.0.1.x86_64 3/6
Verifying : openssh-server-8.7p1-38.el9.x86_64 4/6
Verifying : openssh-clients-8.7p1-45.el9.rocky.0.1.x86_64 5/6
Verifying : openssh-clients-8.7p1-38.el9.x86_64 6/6
Upgraded:
openssh-8.7p1-45.el9.rocky.0.1.x86_64
openssh-clients-8.7p1-45.el9.rocky.0.1.x86_64
openssh-server-8.7p1-45.el9.rocky.0.1.x86_64
Complete!
I per finalitzar habilitarem el servell en l’arrancada del sistema amb la comanda
[root@localhost super] systemctl enable sshd
Ubuntu
El primer que farem serà instal·lar el SSH amb la següent comanda
super@ubuntu:~$ sudo apt install -y openssh-serverReading package lists... Done
Building dependency tree... Done
Reading state information... Done
The following additional packages will be installed:
ncurses-term openssh-client openssh-sftp-server ssh-import-id
Suggested packages:
keychain libpam-ssh monkeysphere ssh-askpass molly-guard
The following NEW packages will be installed:
ncurses-term openssh-server openssh-sftp-server ssh-import-id
The following packages will be upgraded:
openssh-client
1 upgraded, 4 newly installed, 0 to remove and 277 not upgraded.
Need to get 1,738 kB of archives.
After this operation, 6,743 kB of additional disk space will be used.
Get:1 http://es.archive.ubuntu.com/ubuntu noble-updates/main amd64 openssh-client amd64 1:9.6p1-3ubuntu13.14 [906 kB]
Get:2 http://es.archive.ubuntu.com/ubuntu noble-updates/main amd64 openssh-sftp-server amd64 1:9.6p1-3ubuntu13.14 [37.3 kB]
Get:3 http://es.archive.ubuntu.com/ubuntu noble-updates/main amd64 openssh-server amd64 1:9.6p1-3ubuntu13.14 [510 kB]
Get:4 http://es.archive.ubuntu.com/ubuntu noble/main amd64 ncurses-term all 6.4+20240113-1ubuntu2 [275 kB]
Get:5 http://es.archive.ubuntu.com/ubuntu noble-updates/main amd64 ssh-import-id all 5.11-0ubuntu2.24.04.1 [10.1 kB]
Fetched 1,738 kB in 0s (4,752 kB/s)
Preconfiguring packages ...
(Reading database ... 250147 files and directories currently installed.)
Preparing to unpack .../openssh-client_1%3a9.6p1-3ubuntu13.14_amd64.deb ...
Unpacking openssh-client (1:9.6p1-3ubuntu13.14) over (1:9.6p1-3ubuntu13.11) ...
Selecting previously unselected package openssh-sftp-server.
Preparing to unpack .../openssh-sftp-server_1%3a9.6p1-3ubuntu13.14_amd64.deb ...
Unpacking openssh-sftp-server (1:9.6p1-3ubuntu13.14) ...
Selecting previously unselected package openssh-server.
Preparing to unpack .../openssh-server_1%3a9.6p1-3ubuntu13.14_amd64.deb ...
Unpacking openssh-server (1:9.6p1-3ubuntu13.14) ...
Selecting previously unselected package ncurses-term.
Preparing to unpack .../ncurses-term_6.4+20240113-1ubuntu2_all.deb ...
Unpacking ncurses-term (6.4+20240113-1ubuntu2) ...
Selecting previously unselected package ssh-import-id.
Preparing to unpack .../ssh-import-id_5.11-0ubuntu2.24.04.1_all.deb ...
Unpacking ssh-import-id (5.11-0ubuntu2.24.04.1) ...
Setting up openssh-client (1:9.6p1-3ubuntu13.14) ...
Setting up ssh-import-id (5.11-0ubuntu2.24.04.1) ...
Setting up ncurses-term (6.4+20240113-1ubuntu2) ...
Setting up openssh-sftp-server (1:9.6p1-3ubuntu13.14) ...
Setting up openssh-server (1:9.6p1-3ubuntu13.14) ...
Creating config file /etc/ssh/sshd_config with new version
Created symlink /etc/systemd/system/sockets.target.wants/ssh.socket → /usr/lib/s
ystemd/system/ssh.socket.
Created symlink /etc/systemd/system/ssh.service.requires/ssh.socket → /usr/lib/s
ystemd/system/ssh.socket.
Processing triggers for man-db (2.12.0-4build2) ...
Processing triggers for ufw (0.36.2-6) ...I per finalitzar habilitarem el servell en l’arrancada del sistema amb la comanda
super@ubuntu:~/Desktop$ sudo systemctl enable sshSynchronizing state of ssh.service with SysV service script with /usr/lib/systemd/systemd-sysv-install.
Executing: /usr/lib/systemd/systemd-sysv-install enable ssh
Created symlink /etc/systemd/system/sshd.service → /usr/lib/systemd/system/ssh.service.
Created symlink /etc/systemd/system/multi-user.target.wants/ssh.service → /usr/lib/systemd/system/ssh.service.
Debian
El primer que farem serà instal·lar el SSH amb la següent comand
debian1@debian:/home/debian1 sudo apt install openssh-serverHit:1 http://deb.debian.org/debian bookworm InRelease
Get:2 http://security.debian.org/debian-security bookworm-security InRelease [48.0 kB]
Get:3 http://deb.debian.org/debian bookworm-updates InRelease [55.4 kB]
Get:4 http://security.debian.org/debian-security bookworm-security/main Sources [161 kB]
Get:5 http://security.debian.org/debian-security bookworm-security/main amd64 Packages [281 kB]
Get:6 http://security.debian.org/debian-security bookworm-security/main Translation-en [170 kB]
Fetched 715 kB in 0s (2101 kB/s)
Reading package lists... Done
Building dependency tree... Done
Reading state information... Done
3 packages can be upgraded. Run 'apt list --upgradable' to see them.
Reading package lists... Done
Building dependency tree... Done
Reading state information... Done
openssh-server is already the newest version (1:9.2p1-2+deb12u7).I per finalitzar habilitarem el servell en l’arrancada del sistema amb la comanda
debian1@debian:/home/debian1 sudo systemctl enable ssh
Windows 10 Server
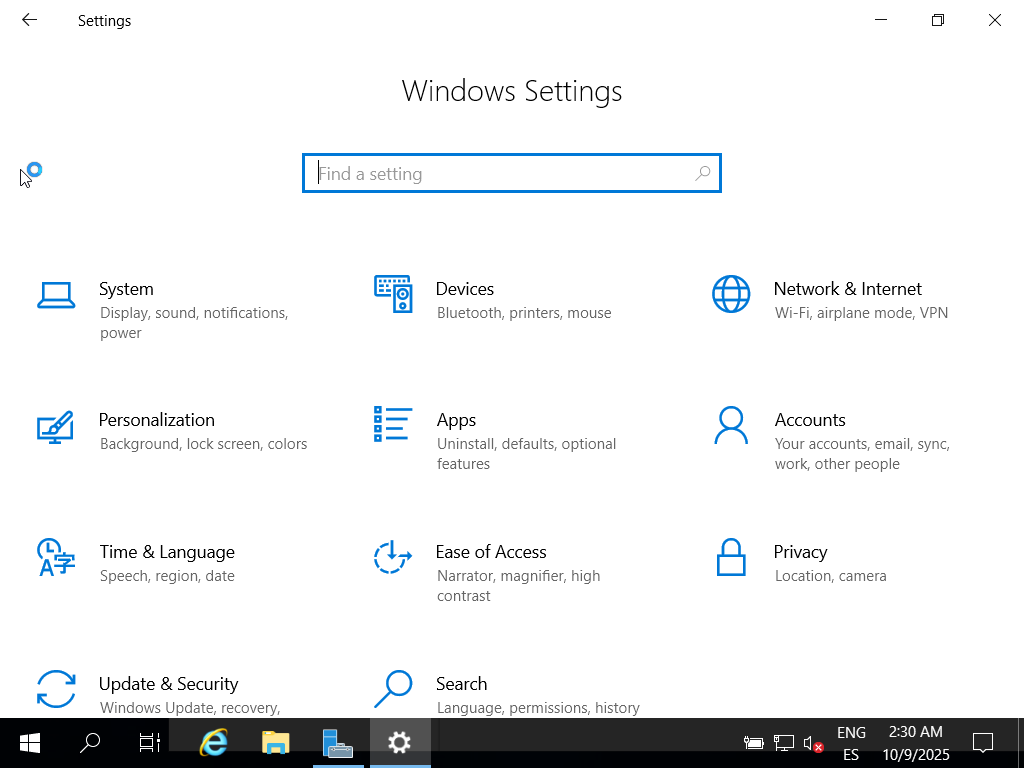
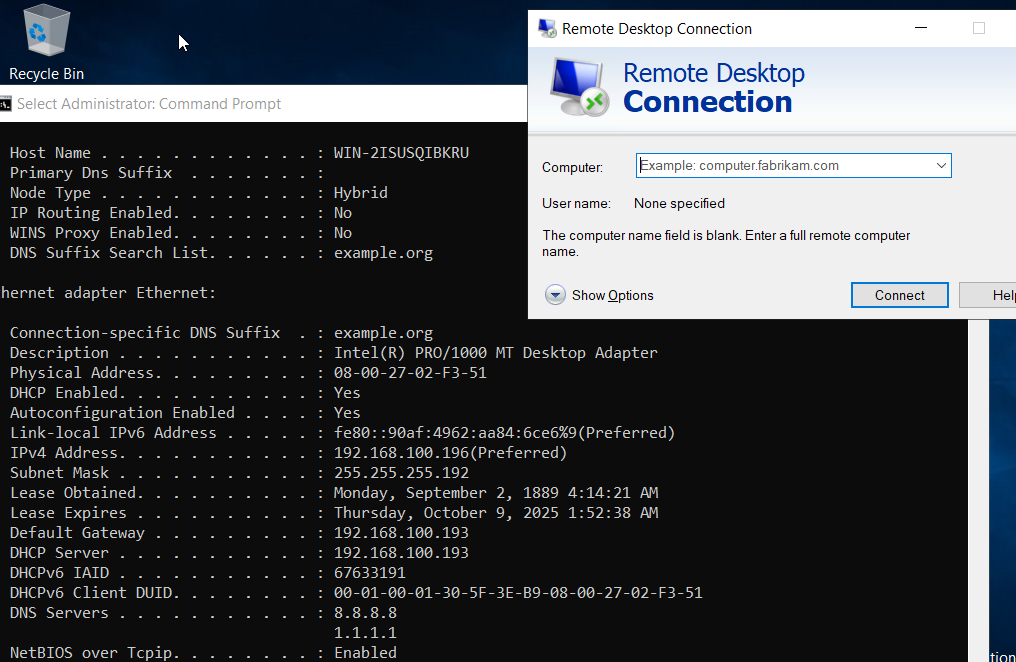
En Windows normalment no s'utilitza el SSH, ja que el que s'utilitza és el rdp, que per activar-ho i tindre accés mitjançant el RDP, per activar el rdp el primer que farem serà anar a la configuració de Windows hi ha system.
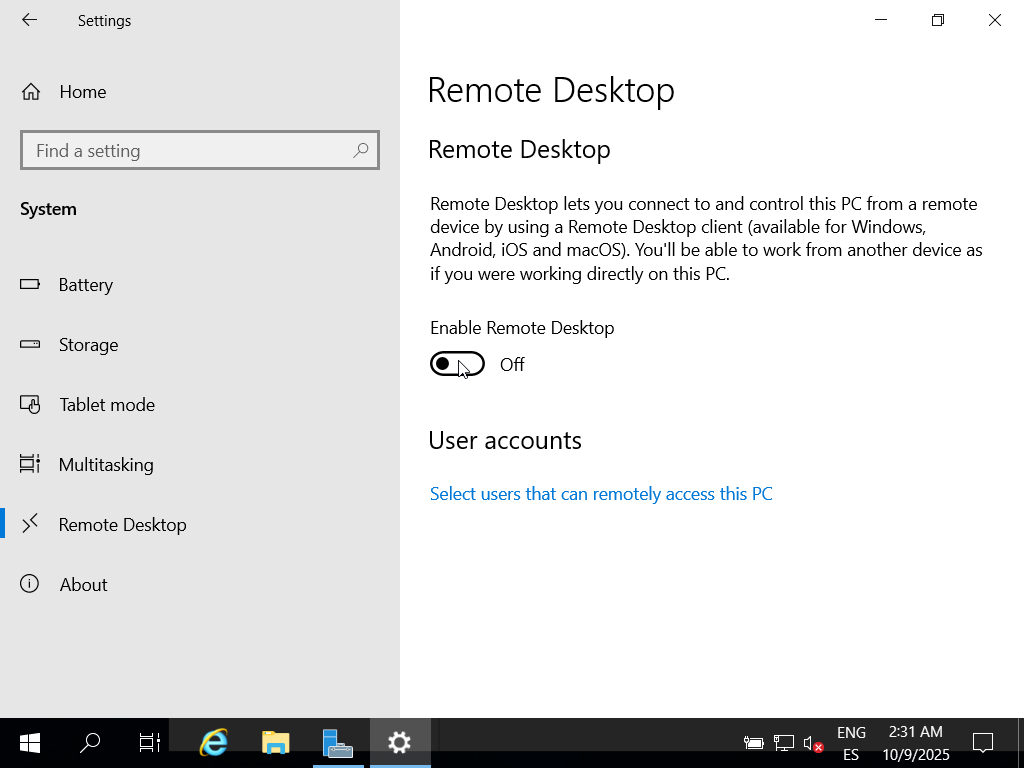
Una vegada en system entrarem en remote desktop, i clicarem en l'única opció, de Enable Remote Desktop
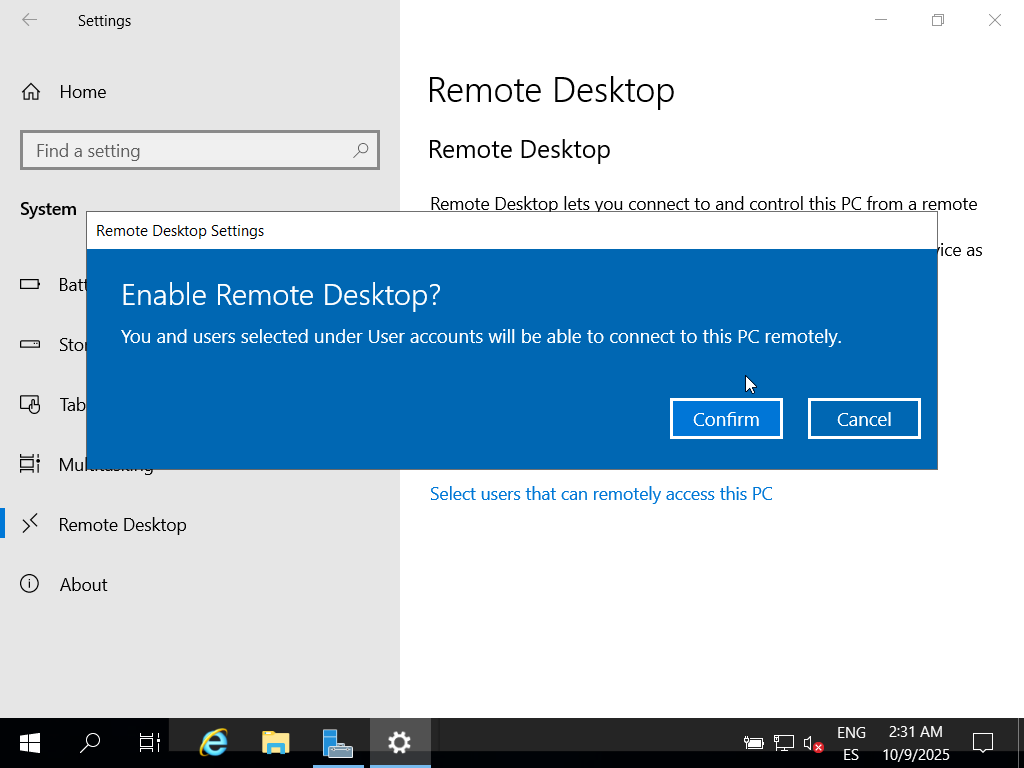
I quan cliquem dintre s'obrira aquest menu blau on clicarem confirm i ja estaria activat.
Però també es pot instal·lar el SSH en cas que el necessitis, per fer-ho el primer que farem serà obrir PowerShell i executar les comandes.
Aquesta comanda serà per fer la instal·lació de SSH
Add-WindowsCapability -Online -Name OpenSSH.Server~~~~0.0.1.0Resultat de la comanda
Path          :
Online        : True
RestartNeeded : False
Ara el que farem serà habilitar el servei, i habilitar de manera automàtica,.
Start-Service sshd
Set-Service -Name sshd -StartupType 'Automatic'
I per finalitzar afegirem una nova regla al firewall, que el que fa aquesta regla de firewall és permetre que la màquina Windows accepti connexions SSH entrants pel port 22, ja que per defecte el firewall de Windows les bloqueja.
New-NetFirewallRule -Name sshd -DisplayName 'OpenSSH Server' -Enabled True -Direction Inbound -Protocol TCP -Action Allow -LocalPort 22
Window 10 Client Server
En Windows normalment no s'utilitza el SSH, ja que el que s'utilitza és el rdp, que per activar-ho i tindre accés mitjançant el RDP, per activar el rdp el primer que farem serà anar a la configuració de Windows hi ha system.

Una vegada en system entrarem en remote desktop, i clicarem en l'única opció, de Enable Remote Desktop
I quan cliquem dintre s'obrira aquest menu blau on clicarem confirm i ja estaria activat.
Però també es pot instal·lar el SSH en cas que el necessitis, per fer-ho el primer que farem serà obrir PowerShell i executar les comandes.
Aquesta comanda serà per fer la instal·lació de SSH
Add-WindowsCapability -Online -Name OpenSSH.Server~~~~0.0.1.0Resultat de la comanda
Path          :
Online        : True
RestartNeeded : False
Ara el que farem serà habilitar el servei, i habilitar de manera automàtica,.
Start-Service sshd
Set-Service -Name sshd -StartupType 'Automatic'
I per finalitzar afegirem una nova regla al firewall, que el que fa aquesta regla de firewall és permetre que la màquina Windows accepti connexions SSH entrants pel port 22, ja que per defecte el firewall de Windows les bloqueja.
New-NetFirewallRule -Name sshd -DisplayName 'OpenSSH Server' -Enabled True -Direction Inbound -Protocol TCP -Action Allow -LocalPort 22